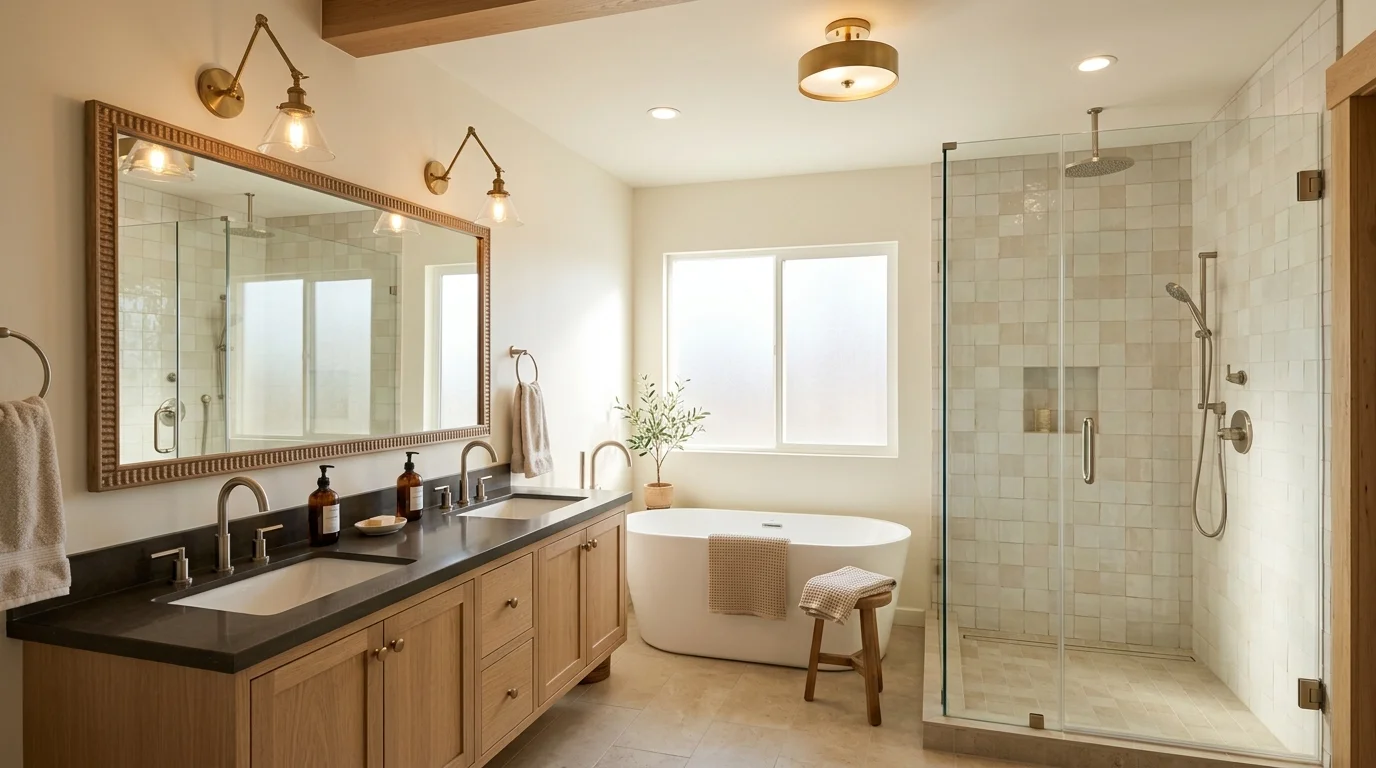
Carlsbad bathroom lighting design works best when ambient, vanity, and bathing-area light are planned as separate layers. The right layout supports morning grooming, nighttime visits, and quiet evening routines without making every fixture equally bright.
Why one ceiling fixture never gets it right
A single ceiling fixture usually lights the floor better than your face. Stand beneath it, and your brow, nose, and chin cast downward shadows. Move toward the shower, and your body may block the light reaching the bathing surface.
Layering solves those conflicts by assigning each fixture a job. General lighting helps you move around the room. Vanity lighting illuminates your face. A separate source can serve the shower or tub. A low, controlled layer can support nighttime use without flooding the entire room.
Start with the room’s actual layout. Mark the vanity, mirror, shower, tub, toilet, storage, doors, and windows. Then trace how someone moves through those zones. A compact bath near Carlsbad Village may need tight fixture placement around a single vanity. A larger primary bathroom in La Costa or Aviara may have several distinct activity areas.
Daylight belongs in the plan too. Window direction, glass type, overhangs, and nearby walls affect how much natural light reaches the room. Check the space during the hours when you’ll use it most. Don’t assume a bright afternoon bathroom will work equally well before sunrise.
Fixture appearance should come after the lighting jobs are clear. That order prevents an attractive pendant or ceiling light from carrying more responsibility than it can handle. A bathroom design plan can connect the lighting layout with the vanity, tile, mirror, and storage choices before materials are ordered.
Vanity lighting and the shadow problem
Vanity lighting should illuminate the face without forcing you to lean toward the mirror. Light coming only from above can deepen shadows around the eyes and jaw. A source closer to face level spreads light across both sides more evenly.
The best arrangement depends on the mirror. A wide mirror, medicine cabinet, framed mirror, and mirrored wall each create different placement limits. Side fixtures need enough clear wall space. A fixture above the mirror must work around the mirror’s height, frame, and any nearby ceiling detail.
Start by marking the sink centerline and the mirror’s final edges. Add the planned faucet, backsplash, outlets, cabinet doors, and trim. This exposes conflicts that aren’t obvious when someone chooses each item separately. A tall backsplash, for example, can change the available mirror position. That shift can affect every light around it.
Surface finishes matter as well. Glossy tile, polished stone, glass, and large mirrors can reflect exposed bulbs. Matte finishes scatter reflections more softly. Before approving a fixture, view it from the doorway and from the normal standing position. Also check whether the bulbs themselves will appear repeatedly in the mirror.
Test the proposed light before the walls close. A temporary lamp or work light can reveal shadow direction, glare, and dark corners. Compare fixture samples beside the selected tile and paint, since the same light can look different against warm and cool finishes.
Our broader guide to bathroom electrical and lighting decisions explains how lighting fits with outlets, controls, ventilation, and the larger remodel sequence.
Recessed placement over a shower or tub
A recessed light over a shower or tub needs two separate decisions. First, decide where the light should land. Then have a licensed pro confirm which fixture and installation method fit that location.
Placing the light at the geometric center isn’t always the strongest design choice. A showerhead, glass panel, ceiling feature, or the user’s body can interrupt the beam. In a tub area, a bright source directly within the reclining sightline may feel harsh. Review the fixture from the position where someone will actually stand or sit.
Use the floor plan and ceiling plan together. Mark the shower entry, controls, niches, glass, tub edge, and nearby walls. Then draw the expected light direction. The goal is usable illumination across the bathing area without creating an isolated bright circle and darker edges.
Don’t choose a recessed fixture from appearance alone. Its approved placement, housing, trim, lamp, driver, and control must work together. Bath Pro SD connects homeowners with licensed, independent local pros who can handle bathroom electrical and lighting work within the larger remodel.
Specific Carlsbad permit triggers and lighting requirements couldn’t be confirmed from the approved primary-source material for this guide. Carlsbad runs its own building department, so the matched pro should confirm the current rules for the exact scope before work begins. Current California energy requirements should also be checked directly with the California Energy Commission. Don’t rely on an old product page or another city’s checklist.
Dimming, colour temperature and the morning routine
Brightness should change with the routine. Morning grooming calls for clear facial light. A late shower may feel better with softer ambient light. Cleaning often benefits from every layer being available together.
Separate controls make those choices possible. Vanity lighting, general ceiling lighting, and shower or tub lighting don’t always need to operate as one group. Decide which layers should switch together and which should remain independent. Put that decision on the plan before wiring begins.
Dimming adds flexibility, but the components need to work together. Confirm compatibility among the fixture, lamp or integrated light source, driver, and control. A beautiful fixture that flickers, drops out, or won’t dim smoothly doesn’t serve the room well.
Color temperature affects the room’s mood and how finishes appear. Warmer light can soften the space. Cooler light can feel crisper. Mixing noticeably different color families within one sightline can make tile, paint, skin, and towels appear inconsistent. Choose a direction, then compare every fixture against it.
Use physical samples whenever possible. Place the vanity finish, countertop, tile, paint, and metal finishes under the proposed light. Check them during daytime and after dark. Natural light varies by window position, so a Carlsbad bathroom near the coast may still need dependable electric light for early mornings and evenings.
Also plan a restrained nighttime setting. It should help someone move through the room without turning every surface bright. The right solution depends on the room and the available controls. It shouldn’t be improvised after tile, mirrors, and cabinetry are installed.
Planning the layout before the walls close
Lighting decisions become more expensive to change once walls and ceilings are finished. A clear plan should identify each fixture, control, mirror edge, cabinet, doorway, plumbing feature, and ceiling obstruction before installation starts.
Begin with a measured floor plan. Add a ceiling plan showing fixture centers and control groups. Then compare both drawings. This catches common conflicts, such as a recessed light crossing a ceiling feature or a wall fixture landing behind an open cabinet door.
Coordinate the mirror and vanity early. Their exact widths and positions affect wall lights, outlets, and sightlines. Do the same for shower glass and tall storage. A light that appears properly placed on an empty wall may feel off-center once those elements arrive.
Review the plan from several positions. Stand at the doorway, vanity, shower entry, and tub. Consider what each person will see directly and through the mirror. Look for exposed bulbs, reflected glare, blocked light, and areas relying on distant fixtures.
Keep product information with the plan. Fixture model details, control compatibility, finish selections, and installation instructions should be available to the licensed pro. If a product changes, review the layout again instead of assuming the replacement behaves identically.
Electrical alterations and permit needs depend on the project’s exact scope. The specific rule for a Carlsbad project should be confirmed with the city’s building department before work starts. You can also verify a contractor’s current status through the official CSLB license check.
That final coordination meeting is the time to resolve uncertainties. It’s much easier to move a mark on a drawing than a junction box behind finished tile.
When to call us
Call when the lighting plan involves new wiring, relocated fixtures, wall changes, or coordination with a larger bathroom remodel. Call us at (858) 400-4896 and we’ll connect you with a licensed local bathroom remodeler.